
How to Cut HTV with Cricut: Easy HTV Project for Beginners
Looking for a simple DIY Halloween project to make with your Cricut Explore, Maker or Joy machine?
Here's a beginner friendly HTV project that is super quick and easy!

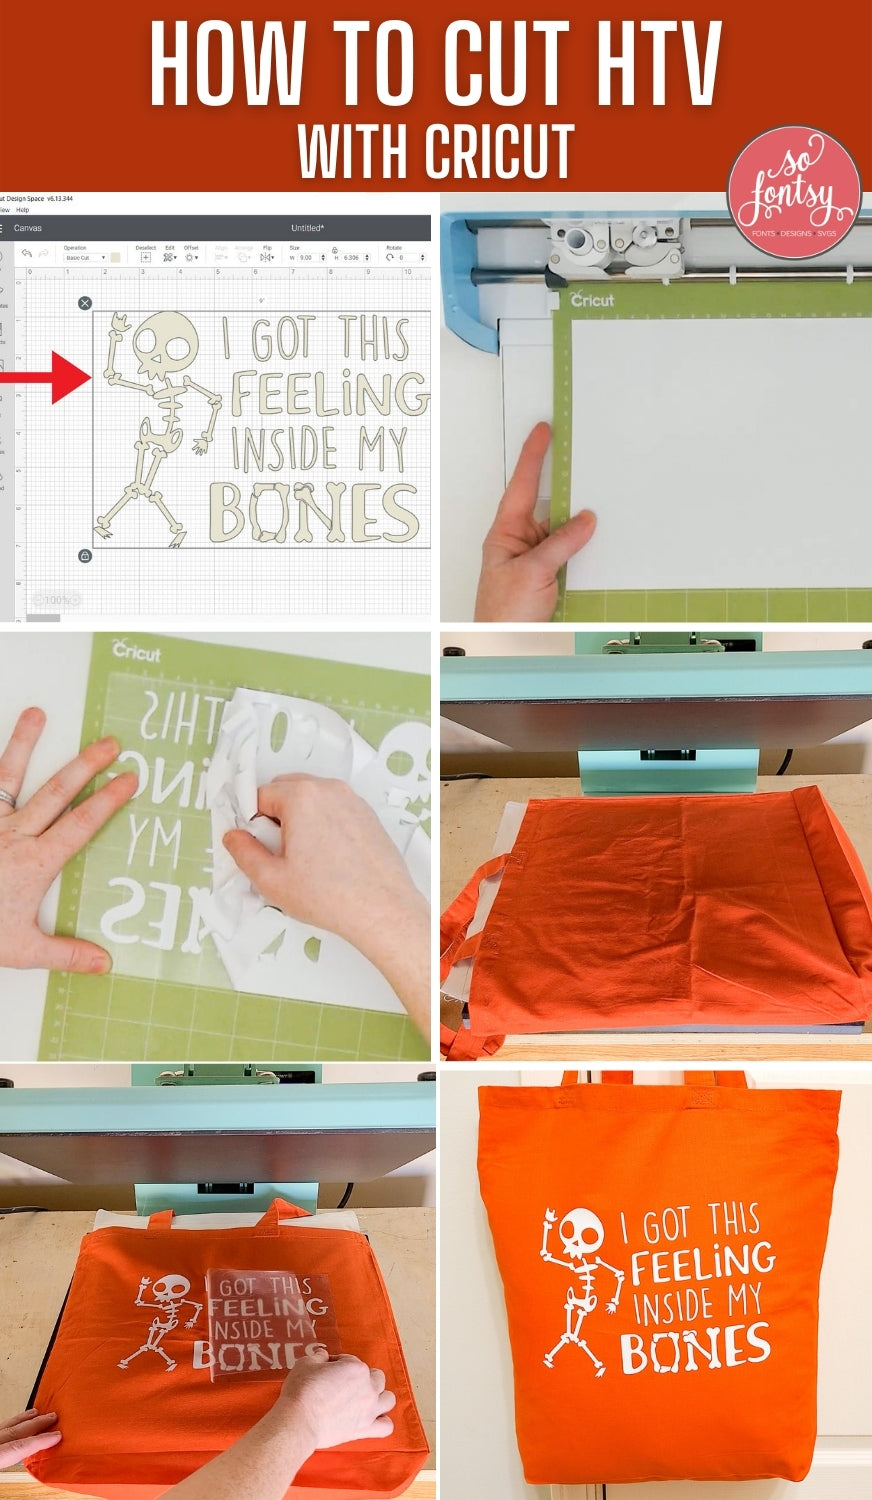
Start by uploading and inserting your SVG design into a new project in Cricut Design Space. We are using this adorable Skeleton Design, which you can find in the October 2021 SVG & Font Bundle.


Check out this blog post tor step-by-step instructions on How to use SVGs with Cricut Design Space.
This is the perfect design to use for a beginner HTV project because it's relatively simple for the Cricut to cut and looks great as a single-color design. So, for this project you are only working with one simple cut into one sheet of HTV.

Next, size the design appropriately for your project. This design was sized at 9 inches wide for a 15-inch-wide canvas bag.
**For your first HTV project, working with larger cuts of HTV can make things a little easier.
Select the entire design, then click Attach Button. This will keep the design in this same orientation when cutting - the design won't be moved around the mat.

Then, click Make It.

As a general rule, HTV designs should be mirrored before cutting (but always check the manufacturer's directions).
We're using Siser Easyweed Glow in the Dark for this project, and the design does need to be mirrored for cutting.
One way to do that in Cricut Design Space is to select this Mirror option.

This will flip the design and you'll see that reflected on the cutting mat.
Then, click Continue.

Turn on your Cricut cutting machine (we're using the Cricut Maker) and connect the Cricut to your computer via Bluetooth or USB.

Next, select your base material. Click Browse All Materials and enter "heat transfer" in the search bar.
Click on Heat Transfer (Non Cricut). This is the cut setting that Siser recommends.

Next, load the recommend tool - in this case the Fine Point Blade - into Clamp B.
Then, load your Cricut cutting mat with a piece of HTV. The piece of HTV you place on the cutting mat should be larger than the design.
You'll find that HTV comes in sheets and rolls and can be cut down to size with either a paper trimmer or scissors.

Make sure to place the HTV in the same area of the cutting as the design is located on the virtual mat - in this case the top left corner.
Stick the HTV to the mat with the shiny side facing down.

Make sure the HTV is sticking smoothly to the mat without any bumps or wrinkles. Running a brayer across it is a great way to ensure it's flat.

Load your cutting mat into the Cricut. Then, press the Go button to start cutting.

When your Cricut is done cutting out the design, unload the cutting mat and weed out the excess HTV from around the design.

You may find this easiest to do by keeping the HTV stuck on the cutting mat, because it holds the piece down while you weed out all the excess.
Next, take your weeded transfer to your heat press (pictured here is the StarCraft 15x15 heat press)

Always follow the HTV manufacturer's directions for pressing. With Siser Easyweed, press at 305 degrees F.
Start by pre-pressing your bag for 2-3 seconds.

Note: If you have a pressing pillow, insert it into the bag before pressing - but a pressing pillow is not necessary for this project.
Then, arrange the transfer on the bag.

Cover with a cover sheet or a piece of parchment paper and press at medium pressure for 10-15 seconds.
Then, gently remove the carrier sheet.

If you're using glow in the dark HTV, take the bag into a dark room and watch it glow! It's so cute!
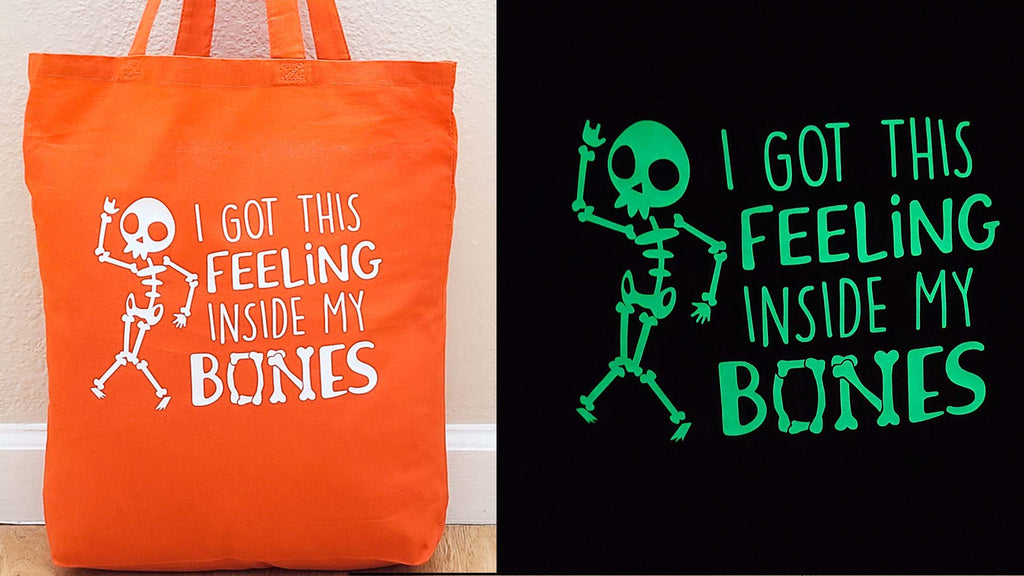
The design we used on this easy DIY Halloween bag comes from the October 2021 SVG and Font Bundle.
Check out the video tutorial for this project below:
And if you want to save this project for later, pin in!
Be sure to sign up for our newsletter to receive weekly tutorials & FREEBIES:


