How to Open So Fontsy SVGs with your Brother ScanNCut
Ready to start crafting with your So Fontsy SVGs and your Brother ScanNCut?! Here's what you need to know about getting the designs onto your cutting machine!

Download and Unzip Your Files
First, download your files from your So Fontsy account. Here are the directions how to download your files from So Fontsy.
Second, all SVG designs downloaded from So Fontsy, come in a ZIP folder. In order to use them, you will need to "un-zip" or extract them.
Here are directions on how to unzip SVG files on a PC / WINDOWS.
Here are directions on how to unzip SVG files on a MAC.
Open SVGs in CanvasWorkspace
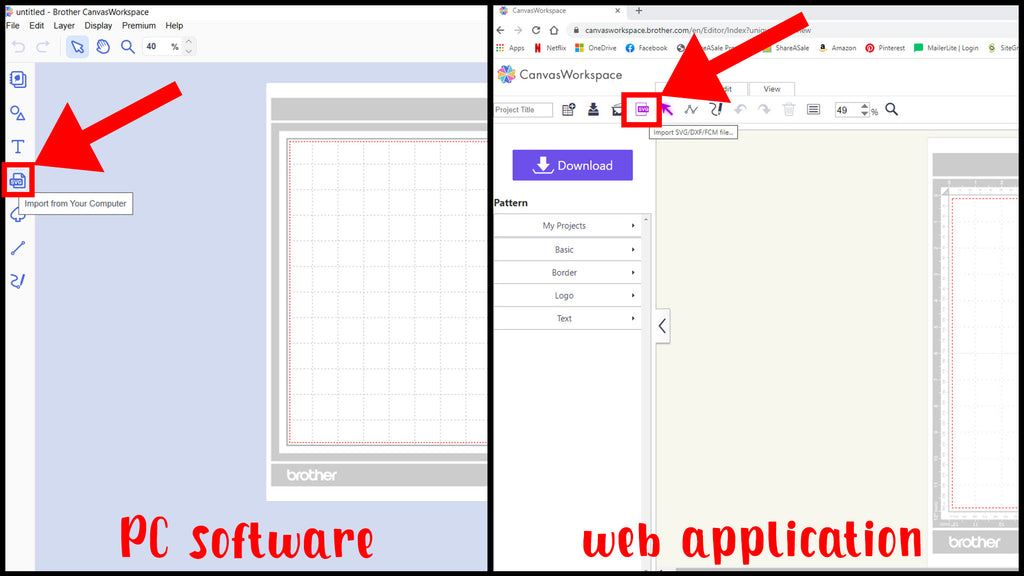
Open and start a new document in either the PC software or web application version of CanvasWorkspace (a free program where you can create or enhance cutting and drawing designs).
Then, click the SVG icon in the menu to import an SVG into CanvasWorkspace. (In the PC software, you can also go to the File menu and click Import from Your Computer).

A dialog box will then open so you can locate where you saved the SVG file on your computer and import it into the new document in CanvasWorkspace.
For a step-by-step tutorial, visit this blog post about how to open SVGs in the CanvasWorkspace web application.
Transfer SVGs to your ScanNCut machine
There are three ways to transfer your So Fontsy SVGs to your ScanNCut.
1. Transfer via Internet
If your ScanNCut has wireless transfer capability, make sure it is connected to the internet.
In the PC software of CanvasWorkspace, click the Export/Transfer FCM File under the File menu.
In the web application, click the large Download button in the left menu.

Then, select the Transfer via Internet option.

Your design is then sent to your ScanNCut machine wirelessly!
2. Transfer via USB cable (PC software only)
Connect your computer to your ScanNCut with a USB cable.

In the PC software of CanvasWorkspace, click Export/Transfer FCM file under the File menu.
Then, select Transfer FCM File to ScanNCut via USB Cable and the design is then sent to your machine.

3. Export (save on USB memory stick)
You can save your So Fontsy SVG files directly to a USB memory stick. Plug the USB stick into your computer and drag the SVG files into the USB stick folder.
You could also first import your SVGs into CanvasWorkspace, customize them as desired, then Export the design onto a USB stick.

Then, plug the USB stick into your ScanNCut.

Opening Files on your ScanNCut Machine
Once you've transferred the design(s) to your ScanNCut (or plugged in the memory stick), you are now ready to retrieve them! On the home screen of your machine, select the Retrieve Data button.

Next, select the method of file transfer you are using.

When you transfer via the internet or cable, the design you transferred will open on the LCD display.

For a USB stick, use the up and down arrow keys on the right to scroll through the designs you have saved on it. Then, select the design you want by tapping on it and finally select Ok.

With the design now open on your ScanNCut, you can either make edits to the design using the LCD display or start cutting or drawing!

Want to be notified when new Scan N Cut Freebies are released?
CLICK HERE to sign up for text notifications.
CLICK HERE to get exclusive FREEBIES by email.


